JAX 类型提升语义的设计#
Jake VanderPlas,2021 年 12 月
任何数值计算库在设计中面临的挑战之一是如何处理不同类型的值之间的运算。本文档概述了 JAX 使用的提升语义背后的思路,总结在JAX 类型提升语义。
JAX 类型提升的目标#
JAX 的数值计算 API 仿照 NumPy 的 API,并进行了一些增强,包括能够以 GPU 和 TPU 等加速器为目标。这使得采用 NumPy 的类型提升系统对 JAX 用户不利:NumPy 的类型提升规则严重倾向于 64 位输出,这对于加速器上的计算来说是有问题的。GPU 和 TPU 等设备通常会为使用 64 位浮点类型付出显著的性能代价,并且在某些情况下根本不支持原生 64 位浮点类型。
一个简单的例子可以说明这种有问题的类型提升语义,即 32 位整数和浮点数之间的二元运算。
import numpy as np
np.dtype(np.int32(1) + np.float32(1))
dtype('float64')
NumPy 倾向于生成 64 位值是一个长期存在的问题,它在使用 NumPy 的 API 进行加速器计算时存在问题,而且目前还没有很好的解决方案。因此,JAX 试图重新思考以加速器为中心的 NumPy 式类型提升。
退一步:表格和格#
在我们深入细节之前,让我们花点时间退一步思考一下如何思考类型提升的问题。考虑 Python 中内置数值类型(即类型为 int、 float 和 complex 的类型)之间的算术运算。通过几行代码,我们可以生成 Python 用于这些类型的值之间加法的类型提升表
import pandas as pd
types = [int, float, complex]
name = lambda t: t.__name__
pd.DataFrame([[name(type(t1(1) + t2(1))) for t1 in types] for t2 in types],
             index=[name(t) for t in types], columns=[name(t) for t in types])
| int | float | complex | |
|---|---|---|---|
| int | int | float | complex |
| float | float | float | complex |
| complex | complex | complex | complex |
此表枚举了 Python 的数值类型提升行为,但事实证明,有一种互补的表示方法更为简洁:格表示法,其中任意两个节点之间的上确界是它们提升到的类型。Python 的提升表的格表示法要简单得多
显示代码单元格源
#@title
import networkx as nx
import matplotlib.pyplot as plt
lattice = {'int': ['float'], 'float': ['complex']}
graph = nx.from_dict_of_lists(lattice, create_using=nx.DiGraph)
pos = {'int': [0, 0], 'float': [1, 0], 'complex': [2, 0]}
fig, ax = plt.subplots(figsize=(8, 2))
nx.draw(graph, with_labels=True, node_size=4000, node_color='lightgray', pos=pos, ax=ax, arrowsize=20)

此格是上面提升表中信息的紧凑编码。您可以通过在图中追踪到两个节点的第一个共同子节点(包括节点本身)来找到两个输入的类型提升结果;从数学上讲,这个共同子节点被称为该对在格上的上确界、最小上界或并;这里我们将此操作称为 并。
从概念上讲,箭头表示允许源和目标之间隐式类型提升:例如,允许从整数到浮点数的隐式提升,但不允许从浮点数到整数的隐式提升。
请记住,通常并非每个有向无环图 (DAG) 都满足格的属性。格要求每对节点都存在唯一的最小上界;因此,例如,以下两个 DAG 不是格
显示代码单元格源
#@title
import networkx as nx
import matplotlib.pyplot as plt

fig, ax = plt.subplots(1, 2, figsize=(10, 2))

lattice = {'A': ['B', 'C']}
graph = nx.from_dict_of_lists(lattice, create_using=nx.DiGraph)
pos = {'A': [0, 0], 'B': [1, 0.5], 'C': [1, -0.5]}
nx.draw(graph, with_labels=True, node_size=2000, node_color='lightgray', pos=pos, ax=ax[0], arrowsize=20)
ax[0].set(xlim=[-0.5, 1.5], ylim=[-1, 1])

lattice = {'A': ['C', 'D'], 'B': ['C', 'D']}
graph = nx.from_dict_of_lists(lattice, create_using=nx.DiGraph)
pos = {'A': [0, 0.5], 'B': [0, -0.5], 'C': [1, 0.5], 'D': [1, -0.5]}
nx.draw(graph, with_labels=True, node_size=2000, node_color='lightgray', pos=pos, ax=ax[1], arrowsize=20)
ax[1].set(xlim=[-0.5, 1.5], ylim=[-1, 1]);

左侧的 DAG 不是格,因为节点 B 和 C 不存在上界;右侧的 DAG 在两个方面都失败了:首先,节点 C 和 D 不存在上界,而对于节点 A 和 B,无法唯一确定最小上界:C 和 D 都是候选者,但它们是不可排序的。
类型提升格的属性#
以格的形式指定类型提升可确保许多有用的属性。用 \(\vee\) 运算符表示格上的并,我们有
存在性:根据定义,格要求每对元素都存在唯一的格并:\(\forall (a, b): \exists !(a \vee b)\)
交换性:格并是可交换的:\(\forall (a, b): a\vee b = b \vee a\)。
结合性:格并是结合的:\(\forall (a, b, c): a \vee (b \vee c) = (a \vee b) \vee c\)。
另一方面,这些属性限制了它们可以表示的类型提升系统;特别是并非每个类型提升表都可以用格来表示。一个现成的例子是 NumPy 的完整类型提升表;这可以通过反例快速证明:以下是 NumPy 中提升行为不具结合性的三种标量类型
import numpy as np
a, b, c = np.int8(1), np.uint8(1), np.float16(1)
print(np.dtype((a + b) + c))
print(np.dtype(a + (b + c)))
float32
float16
这样的结果可能会让用户感到惊讶:我们通常希望数学表达式映射到数学概念,因此,例如,a + b + c 应该等同于 c + b + a;x * (y + z) 应该等同于 x * y + x * z。如果类型提升不具结合性或不具交换性,则这些属性不再适用。
此外,与基于表格的系统相比,基于格的类型提升系统在概念化和理解上更简单。例如,JAX 识别 18 种不同的类型:由 18 个节点和它们之间稀疏、合理连接组成的提升格,比包含 324 个条目的表格更容易掌握。
因此,我们选择为 JAX 使用基于格的类型提升系统。
类别内的类型提升#
数值计算库通常提供的不仅仅是 int、float 和 complex;在这些类别中的每一个类别内,都有各种可能的精度,用数值表示中使用的位数表示。我们将在此处考虑的类别是
无符号整数,包括
uint8、uint16、uint32&uint64(我们将简称为u8、u16、u32、u64)有符号整数,包括
int8、int16、int32&int64(我们将简称为i8、i16、i32、i64)浮点数,包括
float16、float32&float64(我们将简称为f16、f32、f64)复数浮点数,包括
complex64&complex128(我们将简称为c64、c128)
Numpy 在这四个类别中的每一个类别内的类型提升语义都相对简单:类型的有序层次结构直接转换为四个单独的格,表示类别内的类型提升规则
显示代码单元格源
#@title
import networkx as nx
import matplotlib.pyplot as plt
lattice = {
  'u8': ['u16'], 'u16': ['u32'], 'u32': ['u64'],
  'i8': ['i16'], 'i16': ['i32'], 'i32': ['i64'],
  'f16': ['f32'], 'f32': ['f64'],
  'c64': ['c128']
}
graph = nx.from_dict_of_lists(lattice, create_using=nx.DiGraph)
pos = {
  'u8': [0, 0], 'u16': [1, 0], 'u32': [2, 0], 'u64': [3, 0],
  'i8': [0, 1], 'i16': [1, 1], 'i32': [2, 1], 'i64': [3, 1],
  'f16': [1, 2], 'f32': [2, 2], 'f64': [3, 2],
  'c64': [2, 3], 'c128': [3, 3],
}
fig, ax = plt.subplots(figsize=(6, 4))
nx.draw(graph, with_labels=True, node_size=1500, node_color='lightgray', pos=pos, ax=ax)
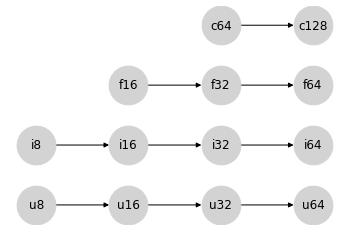
就 JAX 试图避免的值提升到 64 位而言,每个类型类别内的这些同类提升语义没有问题:产生 64 位输出的唯一方法是具有 64 位输入。
输入 Python 标量#
现在让我们考虑一下 Python 标量在其中的位置。
在 NumPy 中,提升行为取决于输入是数组还是标量。例如,当对两个标量进行运算时,应用正常的提升规则
x = np.int8(0)  # int8 scalar
y = 1  # Python int = int64 scalar
(x + y).dtype
dtype('int64')
此处,Python 值 1 被视为 int64,并且类别内的直接规则会产生 int64 结果。
但是,在 Python 标量和 NumPy 数组之间的运算中,标量会服从数组的 dtype。例如
x = np.zeros(1, dtype='int8')  # int8 array
y = 1  # Python int = int64 scalar
(x + y).dtype
dtype('int8')
这里忽略了 int64 标量的位宽,转而服从数组的位宽。
这里还有一个细节:当 NumPy 类型提升涉及标量时,输出 dtype 取决于值:如果 Python 标量对于给定的 dtype 而言太大,则它会提升为兼容的类型
x = np.zeros(1, dtype='int8')  # int8 array
y = 1000  # int64 scalar
(x + y).dtype
dtype('int16')
出于 JAX 的目的,由于 JIT 编译和其他转换的性质,依赖于值的提升是不可取的,这些转换在数据的抽象表示上操作,而不参考它们的值。
忽略依赖于值的影响,NumPy 的类型提升的有符号整数分支可以用以下格表示,其中我们将使用 * 来标记标量 dtype
显示代码单元格源
#@title
import networkx as nx
import matplotlib.pyplot as plt
lattice = {
  'i8*': ['i16*'], 'i16*': ['i32*'], 'i32*': ['i64*'], 'i64*': ['i8'],
  'i8': ['i16'], 'i16': ['i32'], 'i32': ['i64']
}
graph = nx.from_dict_of_lists(lattice, create_using=nx.DiGraph)
pos = {
  'i8*': [0, 1], 'i16*': [2, 1], 'i32*': [4, 1], 'i64*': [6, 1],
  'i8': [9, 1], 'i16': [11, 1], 'i32': [13, 1], 'i64': [15, 1],
}
fig, ax = plt.subplots(figsize=(12, 4))
nx.draw(graph, with_labels=True, node_size=1500, node_color='lightgray', pos=pos, ax=ax)
ax.text(3, 1.6, "Scalar Types", ha='center', fontsize=14)
ax.text(12, 1.6, "Array Types", ha='center', fontsize=14)
ax.set_ylim(-1, 3);
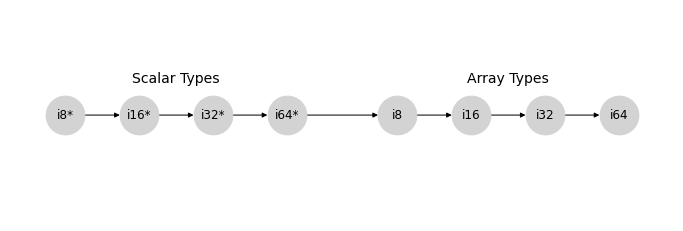
类似的模式也存在于 uint、float 和 complex 格中。
为了简单起见,让我们将每种标量类型归为单个节点,分别用 u*、i*、f* 和 c* 表示。我们类别内的格结构现在可以表示为这样
显示代码单元格源
#@title
import networkx as nx
import matplotlib.pyplot as plt
lattice = {
  'u*': ['u8'], 'u8': ['u16'], 'u16': ['u32'], 'u32': ['u64'],
  'i*': ['i8'], 'i8': ['i16'], 'i16': ['i32'], 'i32': ['i64'],
  'f*': ['f16'], 'f16': ['f32'], 'f32': ['f64'],
  'c*': ['c64'], 'c64': ['c128']
}
graph = nx.from_dict_of_lists(lattice, create_using=nx.DiGraph)
pos = {
  'u*': [0, 0], 'u8': [3, 0], 'u16': [5, 0], 'u32': [7, 0], 'u64': [9, 0],
  'i*': [0, 1], 'i8': [3, 1], 'i16': [5, 1], 'i32': [7, 1], 'i64': [9, 1],
  'f*': [0, 2], 'f16': [5, 2], 'f32': [7, 2], 'f64': [9, 2],
  'c*': [0, 3], 'c64': [7, 3], 'c128': [9, 3],
}
fig, ax = plt.subplots(figsize=(6, 4))
nx.draw(graph, with_labels=True, node_size=1500, node_color='lightgray', pos=pos, ax=ax)
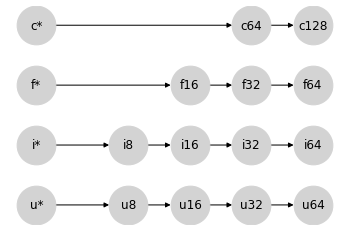
在某种意义上,将标量放在左边是一个奇怪的选择:标量类型可以包含任意宽度值,但当与给定类型的数组交互时,提升结果会遵从数组类型。这样做的好处是,当你对数组 x 执行诸如 x + 2 的操作时,x 的类型将传递到结果,无论其宽度如何。
for dtype in [np.int8, np.int16, np.int32, np.int64]:
  x = np.arange(10, dtype=dtype)
  assert (x + 2).dtype == dtype
这种行为为我们使用 * 符号表示标量值提供了理由:* 类似于一个通配符,可以采用任何期望的值。
这些语义的好处在于,您可以使用简洁的 Python 代码轻松地表达操作序列,而无需显式地将标量强制转换为适当的类型。想象一下,如果不是这样写
3 * (x + 1) ** 2
而是必须这样写
np.int32(3) * (x + np.int32(1)) ** np.int32(2)
尽管很明确,但数值代码会变得难以阅读或编写。使用上述标量提升语义,给定一个 int32 类型的数组 x,第二个语句中的类型在第一个语句中是隐式的。
合并格结构#
回想一下,我们最初的讨论是通过介绍表示 Python 中类型提升的格结构开始的:int -> float -> complex。让我们将其重写为 i* -> f* -> c*,并进一步允许 i* 包含 u*(毕竟,Python 中没有无符号整数标量类型)。
将它们放在一起,我们得到以下表示 Python 标量和 numpy 数组之间类型提升的部分格结构
显示代码单元格源
#@title
import networkx as nx
import matplotlib.pyplot as plt
lattice = {
  'i*': ['f*', 'u8', 'i8'], 'f*': ['c*', 'f16'], 'c*': ['c64'],
  'u8': ['u16'], 'u16': ['u32'], 'u32': ['u64'],
  'i8': ['i16'], 'i16': ['i32'], 'i32': ['i64'],
  'f16': ['f32'], 'f32': ['f64'],
  'c64': ['c128']
}
graph = nx.from_dict_of_lists(lattice, create_using=nx.DiGraph)
pos = {
  'i*': [-1.25, 0.5], 'f*': [-0.5, 2], 'c*': [0, 3],
  'u8': [0.5, 0], 'u16': [1.5, 0], 'u32': [2.5, 0], 'u64': [3.5, 0],
  'i8': [0, 1], 'i16': [1, 1], 'i32': [2, 1], 'i64': [3, 1],
  'f16': [0.5, 2], 'f32': [1.5, 2], 'f64': [2.5, 2],
  'c64': [2, 3], 'c128': [3, 3],
}
fig, ax = plt.subplots(figsize=(6, 5))
nx.draw(graph, with_labels=True, node_size=1500, node_color='lightgray', pos=pos, ax=ax)
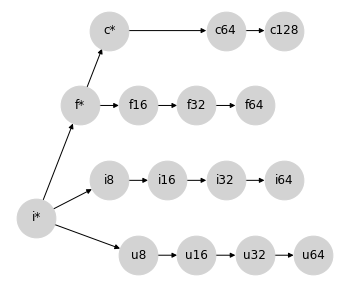
请注意,这(还)不是一个真正的格结构:有许多节点对不存在连接。但是,我们可以将其视为一个部分格结构,其中某些节点对没有定义的提升行为,而这个部分格结构的定义部分确实正确地描述了 NumPy 的数组提升行为(暂且不考虑上面提到的值依赖语义)。
这为我们提供了一个很好的框架,我们可以通过在图上添加连接来考虑填充这些未定义的提升规则。但是要添加哪些连接呢?总的来说,我们希望任何额外的连接都满足以下几个属性
提升应满足交换律和结合律:换句话说,图应该保持为一个(部分)格结构。
提升永远不应允许丢弃数据的整个组成部分:例如,我们永远不应将
complex提升为float,因为它会丢弃任何虚部。提升永远不应导致未处理的溢出。例如,可能的
uint32最大值是可能的int32最大值的两倍,因此我们不应隐式地将uint32提升为int32。在可能的情况下,提升应避免精度损失。例如,
int64值可能具有 64 位的尾数,因此将int64提升为float64可能表示精度损失。但是,可表示的最大 float64 大于可表示的最大 int64,因此在这种情况下,仍然满足条件 #3。在可能的情况下,二进制提升应避免产生比输入更宽的类型。这是为了确保 JAX 的隐式提升对基于加速器的工作流程保持友好,在这些工作流程中,用户通常希望将类型限制为 32 位(在某些情况下为 16 位)值。
格结构上的每个新连接都会为用户带来一定程度的便利(一组新的可以交互而无需显式强制转换的类型),但是如果违反上述任何标准,便利性可能会变得过于昂贵。开发完整的提升格结构需要在这种便利性和成本之间取得平衡。
混合提升:浮点数和复数#
让我们从可能最简单的情况开始,即浮点值和复数值之间的提升。
复数由成对的浮点数组成,因此它们之间存在自然的提升路径:在保持实部宽度的同时,将浮点数转换为复数。用我们的部分格结构表示,它看起来像这样
显示代码单元格源
#@title
import networkx as nx
import matplotlib.pyplot as plt
lattice = {
  'i*': ['f*', 'u8', 'i8'], 'f*': ['c*', 'f16'], 'c*': ['c64'],
  'u8': ['u16'], 'u16': ['u32'], 'u32': ['u64'],
  'i8': ['i16'], 'i16': ['i32'], 'i32': ['i64'],
  'f16': ['f32'], 'f32': ['f64', 'c64'], 'f64': ['c128'],
  'c64': ['c128']
}
graph = nx.from_dict_of_lists(lattice, create_using=nx.DiGraph)
pos = {
  'i*': [-1.25, 0.5], 'f*': [-0.5, 2], 'c*': [0, 3],
  'u8': [0.5, 0], 'u16': [1.5, 0], 'u32': [2.5, 0], 'u64': [3.5, 0],
  'i8': [0, 1], 'i16': [1, 1], 'i32': [2, 1], 'i64': [3, 1],
  'f16': [0.5, 2], 'f32': [1.5, 2], 'f64': [2.5, 2],
  'c64': [2, 3], 'c128': [3, 3],
}
fig, ax = plt.subplots(figsize=(6, 5))
nx.draw(graph, with_labels=True, node_size=1500, node_color='lightgray', pos=pos, ax=ax)
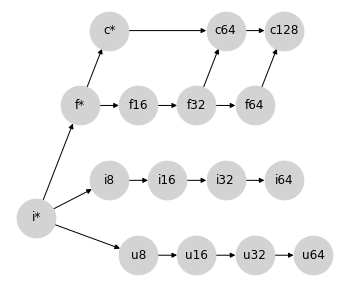
事实证明,这正是 Numpy 在混合浮点/复数类型提升中使用的语义。
混合提升:有符号和无符号整数#
对于下一个例子,让我们考虑一些更困难的情况:有符号整数和无符号整数之间的提升。例如,当将 uint8 提升为有符号整数时,我们需要多少位?
乍一看,您可能会认为将 uint8 提升为 int8 是很自然的;但是,最大的 uint8 数字在 int8 中无法表示。因此,将无符号整数提升为位数加倍的整数更有意义;这种提升行为可以通过在提升格结构中添加以下连接来表示
显示代码单元格源
#@title
import networkx as nx
import matplotlib.pyplot as plt
lattice = {
  'i*': ['f*', 'u8', 'i8'], 'f*': ['c*', 'f16'], 'c*': ['c64'],
  'u8': ['u16', 'i16'], 'u16': ['u32', 'i32'], 'u32': ['u64', 'i64'],
  'i8': ['i16'], 'i16': ['i32'], 'i32': ['i64'],
  'f16': ['f32'], 'f32': ['f64', 'c64'], 'f64': ['c128'],
  'c64': ['c128']
}
graph = nx.from_dict_of_lists(lattice, create_using=nx.DiGraph)
pos = {
  'i*': [-1.25, 0.5], 'f*': [-0.5, 2], 'c*': [0, 3],
  'u8': [0.5, 0], 'u16': [1.5, 0], 'u32': [2.5, 0], 'u64': [3.5, 0],
  'i8': [0, 1], 'i16': [1, 1], 'i32': [2, 1], 'i64': [3, 1],
  'f16': [0.5, 2], 'f32': [1.5, 2], 'f64': [2.5, 2],
  'c64': [2, 3], 'c128': [3, 3],
}
fig, ax = plt.subplots(figsize=(6, 5))
nx.draw(graph, with_labels=True, node_size=1500, node_color='lightgray', pos=pos, ax=ax)
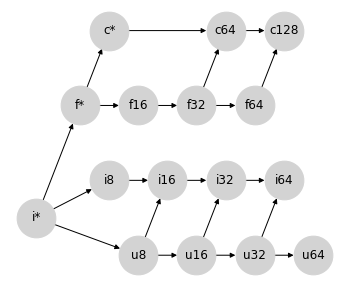
同样,此处添加的连接正是 Numpy 为混合整数提升实现的提升语义。
如何处理 uint64?#
混合有符号/无符号整数提升的方法遗漏了一种类型:uint64。按照上面的模式,涉及 uint64 的混合整数运算的输出应产生 int128,但这不是标准的可用 dtype。
Numpy 在这里的选择是提升为 float64
(np.uint64(1) + np.int64(1)).dtype
dtype('float64')
但是,这可能是一个令人惊讶的约定:这是整数类型提升不产生整数的唯一情况。现在,我们将 uint64 提升保持未定义,稍后再返回。
混合提升:整数和浮点数#
在将整数提升为浮点数时,我们可以从与有符号整数和无符号整数之间的混合提升相同的思路开始。一个 16 位有符号或无符号整数无法由具有 10 位尾数的 16 位浮点数以全精度表示。因此,将整数提升为以位数加倍表示的浮点数可能是有意义的
显示代码单元格源
#@title
import networkx as nx
import matplotlib.pyplot as plt
lattice = {
  'i*': ['f*', 'u8', 'i8'], 'f*': ['c*', 'f16'], 'c*': ['c64'],
  'u8': ['u16', 'i16', 'f16'], 'u16': ['u32', 'i32', 'f32'], 'u32': ['u64', 'i64', 'f64'],
  'i8': ['i16', 'f16'], 'i16': ['i32', 'f32'], 'i32': ['i64', 'f64'],
  'f16': ['f32'], 'f32': ['f64', 'c64'], 'f64': ['c128'],
  'c64': ['c128']
}
graph = nx.from_dict_of_lists(lattice, create_using=nx.DiGraph)
pos = {
  'i*': [-1.25, 0.5], 'f*': [-0.5, 2], 'c*': [0, 3],
  'u8': [0.5, 0], 'u16': [1.5, 0], 'u32': [2.5, 0], 'u64': [3.5, 0],
  'i8': [0, 1], 'i16': [1, 1], 'i32': [2, 1], 'i64': [3, 1],
  'f16': [0.5, 2], 'f32': [1.5, 2], 'f64': [2.5, 2],
  'c64': [2, 3], 'c128': [3, 3],
}
fig, ax = plt.subplots(figsize=(6, 5))
nx.draw(graph, with_labels=True, node_size=1500, node_color='lightgray', pos=pos, ax=ax)
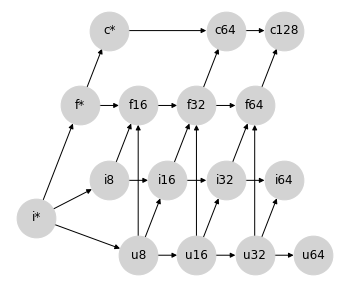
这实际上就是 Numpy 类型提升的作用,但是这样做会破坏图的格属性:例如,对 {i8, u8} 不再具有唯一的最小上限:可能性是 i16 和 f16,它们在图上是不可排序的。事实证明,这正是上面强调的 NumPy 非关联类型提升的根源。
我们是否可以提出对 NumPy 提升规则的修改,使其满足格属性,同时为混合类型提升提供合理的结果?我们可以采取几种方法。
选项 0:使整数/浮点混合精度未定义#
为了使行为完全可预测(以牺牲用户便利性为代价),一种合理的选择是将任何超出 Python 标量的混合整数/浮点提升定义为未定义,并停止于上一节中的部分格结构。缺点是,用户在整数和浮点数量之间进行操作时,需要显式进行类型转换。
选项 1:避免所有精度损失#
如果我们的重点是以不惜一切代价避免精度损失,我们可以通过其现有的有符号整数路径将无符号整数提升为浮点数来恢复格属性
显示代码单元格源
#@title
import networkx as nx
import matplotlib.pyplot as plt
lattice = {
  'i*': ['f*', 'u8', 'i8'], 'f*': ['c*', 'f16'], 'c*': ['c64'],
  'u8': ['u16', 'i16'], 'u16': ['u32', 'i32'], 'u32': ['u64', 'i64'],
  'i8': ['i16', 'f16'], 'i16': ['i32', 'f32'], 'i32': ['i64', 'f64'],
  'f16': ['f32'], 'f32': ['f64', 'c64'], 'f64': ['c128'],
  'c64': ['c128']
}
graph = nx.from_dict_of_lists(lattice, create_using=nx.DiGraph)
pos = {
  'i*': [-1.25, 0.5], 'f*': [-0.5, 2], 'c*': [0, 3],
  'u8': [0.5, 0], 'u16': [1.5, 0], 'u32': [2.5, 0], 'u64': [3.5, 0],
  'i8': [0, 1], 'i16': [1, 1], 'i32': [2, 1], 'i64': [3, 1],
  'f16': [0.5, 2], 'f32': [1.5, 2], 'f64': [2.5, 2],
  'c64': [2, 3], 'c128': [3, 3],
}
fig, ax = plt.subplots(figsize=(6, 5))
nx.draw(graph, with_labels=True, node_size=1500, node_color='lightgray', pos=pos, ax=ax)
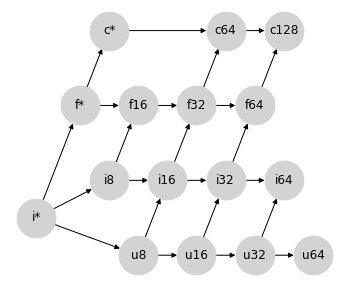
这种方法的一个缺点是,它仍然使 int64 和 uint64 提升未定义,因为没有具有足够尾数位来表示其完整值范围的标准浮点类型。我们可以放宽精度约束,并通过从 i64->f64 和 u64->f64 绘制连接来完成格结构,但是这些链接将与此提升方案的动机背道而驰。
第二个缺点是,此格结构使我们很难找到在保持格属性的同时插入 bfloat16(见下文)的合适位置。
这种方法的第三个缺点,对于 JAX 的加速器后端来说更为重要,是一些操作会导致类型比实际需要的更宽;例如,uint16 和 float16 之间的混合操作会一直提升到 float64,这并非理想情况。
选项 2:避免大多数不必要地提升到更宽的类型#
为了解决不必要地提升到更宽类型的问题,我们可以接受整数/浮点数提升中可能存在的一些精度损失,将有符号整数提升为相同宽度的浮点数。
显示代码单元格源
#@title
import networkx as nx
import matplotlib.pyplot as plt
lattice = {
  'i*': ['f*', 'u8', 'i8'], 'f*': ['c*', 'f16'], 'c*': ['c64'],
  'u8': ['u16', 'i16'], 'u16': ['u32', 'i32'], 'u32': ['u64', 'i64'],
  'i8': ['i16'], 'i16': ['f16', 'i32'], 'i32': ['f32', 'i64'], 'i64': ['f64'],
  'f16': ['f32'], 'f32': ['f64', 'c64'], 'f64': ['c128'],
  'c64': ['c128']
}
graph = nx.from_dict_of_lists(lattice, create_using=nx.DiGraph)
pos = {
  'i*': [-1.25, 0.5], 'f*': [-0.5, 2], 'c*': [0, 3],
  'u8': [0.5, 0], 'u16': [1.5, 0], 'u32': [2.5, 0], 'u64': [3.5, 0],
  'i8': [0, 1], 'i16': [1, 1], 'i32': [2, 1], 'i64': [3, 1],
  'f16': [1.5, 2], 'f32': [2.5, 2], 'f64': [3.5, 2],
  'c64': [3, 3], 'c128': [4, 3],
}
fig, ax = plt.subplots(figsize=(6, 5))
nx.draw(graph, with_labels=True, node_size=1500, node_color='lightgray', pos=pos, ax=ax)
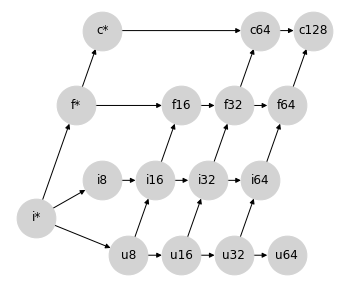
虽然这允许整数和浮点数之间进行精度损失的提升,但这些提升不会错误地表示结果的量级:尽管浮点尾数不足以表示所有值,但指数足以近似它们。
这种方法还允许从 int64 到 float64 的自然提升路径,尽管在此方案中 uint64 仍然无法提升。即便如此,u64 到 f64 的连接在这里比以前更容易被证明是合理的。
这种提升方案仍然会导致一些比实际需要的更宽的提升路径;例如,float32 和 uint32 之间的操作会导致 float64。此外,这个格结构使得在保持格属性的同时很难找到插入 bfloat16 的合理位置(见下文)。
选项 3:避免所有不必要地提升到更宽的类型#
如果我们愿意从根本上改变我们对整数和浮点数提升的看法,我们可以避免所有非理想的 64 位提升。正如标量总是服从于数组类型的宽度一样,我们可以使整数始终服从于浮点类型的宽度。
显示代码单元格源
#@title
import networkx as nx
import matplotlib.pyplot as plt
lattice = {
  'i*': ['u8', 'i8'], 'f*': ['c*', 'f16'], 'c*': ['c64'],
  'u8': ['u16', 'i16'], 'u16': ['u32', 'i32'], 'u32': ['u64', 'i64'],
  'i8': ['i16'], 'i16': ['i32'], 'i32': ['i64'], 'i64': ['f*'],
  'f16': ['f32'], 'f32': ['f64', 'c64'], 'f64': ['c128'],
  'c64': ['c128']
}
graph = nx.from_dict_of_lists(lattice, create_using=nx.DiGraph)
pos = {
  'i*': [-1.25, 0.5], 'f*': [-0.5, 2], 'c*': [0, 3],
  'u8': [0.5, 0], 'u16': [1.5, 0], 'u32': [2.5, 0], 'u64': [3.5, 0],
  'i8': [0, 1], 'i16': [1, 1], 'i32': [2, 1], 'i64': [3, 1],
  'f16': [1.5, 2], 'f32': [2.5, 2], 'f64': [3.5, 2],
  'c64': [3, 3], 'c128': [4, 3],
}
fig, ax = plt.subplots(figsize=(6, 5))
nx.draw(graph, with_labels=True, node_size=1500, node_color='lightgray', pos=pos, ax=ax)
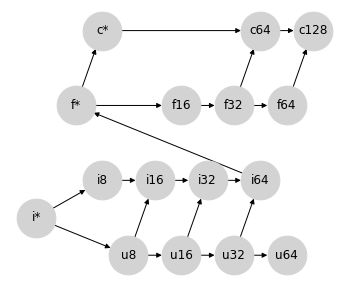
这涉及到一个小技巧:之前我们使用 f* 来指代标量类型。在这个格结构中,f* 可以应用于混合计算的数组输出。与其将 f* 视为标量,我们可以将其视为一种特殊的 float 值,具有不同的提升规则:在 JAX 中,我们将其称为弱浮点数;见下文。
这种方法的优点是,在无符号整数之外,它可以避免所有不必要地提升到更宽的类型:没有 64 位输入,你永远不会得到 f64 输出,并且没有 32 位输入,你永远不会得到 f32 输出:这在加速器上进行计算时会产生方便的语义,同时避免意外的 64 位值。
这种赋予浮点类型优先地位的特性类似于 PyTorch 的类型提升行为。这个格结构也恰好生成了一个非常类似于 JAX 最初的临时类型提升方案的提升表,该方案不是基于格结构,但具有赋予浮点类型优先地位的特性。
这个格结构还提供了一个插入 bfloat16 的自然位置,而无需在 bf16 和 f16 之间强加排序。
显示代码单元格源
#@title
import networkx as nx
import matplotlib.pyplot as plt
lattice = {
  'i*': ['u8', 'i8'], 'f*': ['c*', 'f16', 'bf16'], 'c*': ['c64'],
  'u8': ['u16', 'i16'], 'u16': ['u32', 'i32'], 'u32': ['u64', 'i64'],
  'i8': ['i16'], 'i16': ['i32'], 'i32': ['i64'], 'i64': ['f*'],
  'f16': ['f32'], 'bf16': ['f32'], 'f32': ['f64', 'c64'], 'f64': ['c128'],
  'c64': ['c128']
}
graph = nx.from_dict_of_lists(lattice, create_using=nx.DiGraph)
pos = {
  'i*': [-1.25, 0.5], 'f*': [-0.5, 2], 'c*': [0, 3],
  'u8': [0.5, 0], 'u16': [1.5, 0], 'u32': [2.5, 0], 'u64': [3.5, 0],
  'i8': [0, 1], 'i16': [1, 1], 'i32': [2, 1], 'i64': [3, 1],
  'f16': [1.8, 1.7], 'bf16': [1.8, 2.3], 'f32': [3.0, 2], 'f64': [4.0, 2],
  'c64': [3.5, 3], 'c128': [4.5, 3],
}
fig, ax = plt.subplots(figsize=(6, 5))
nx.draw(graph, with_labels=True, node_size=1500, node_color='lightgray', pos=pos, ax=ax)
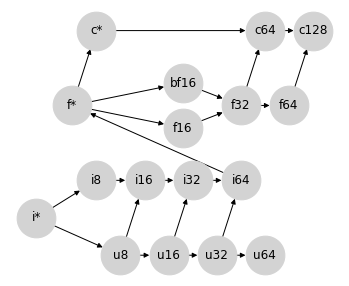
这很重要,因为 f16 和 bf16 不可比较,因为它们以不同的方式利用它们的位:bf16 以较低的精度表示更大的范围,而 f16 以较高的精度表示较小的范围。
然而,这些优势也带来了一些权衡。
混合浮点数/整数提升非常容易导致精度损失:例如,
int64(最大值为 \(9.2 \times 10^{18}\))可以提升为float16(最大值为 \(6.5 \times 10^4\)),这意味着大多数可表示的值将变为inf。如上所述,
f*不再被认为是“标量类型”,而是一种不同风格的 float64。在 JAX 的术语中,这被称为弱类型,因为它被表示为 64 位,但在与其他值进行提升时仅弱保持此位宽度。
请注意,这种方法仍然没有回答 uint64 的提升问题,尽管将 u64 连接到 f* 来关闭这个格结构可能是合理的。
JAX 中的类型提升#
在设计 JAX 的类型提升语义时,我们考虑了许多这些想法,并严重依赖于以下几点:
我们选择将 JAX 的类型提升语义约束为满足格属性的图:这是为了确保结合性和交换性,而且还允许语义以 DAG 的形式紧凑地描述,而不是需要一个大的表。
我们倾向于避免意外提升到更宽类型的语义,尤其是在涉及浮点值时,以便有利于在加速器上进行计算。
如果为了保持 (1) 和 (2) 是必需的,我们乐于接受混合类型提升中潜在的精度损失(但不是量级损失)。
考虑到这一点,JAX 采用了选项 3。或者更确切地说,是选项 3 的稍微修改过的版本,它在 u64 和 f* 之间建立了联系,以创建一个真正的格结构。为了清晰起见,重新排列节点后,JAX 的类型提升格结构如下所示:
显示代码单元格源
#@title
import networkx as nx
import matplotlib.pyplot as plt
lattice = {
  'i*': ['u8', 'i8'], 'f*': ['c*', 'f16', 'bf16'], 'c*': ['c64'],
  'u8': ['u16', 'i16'], 'u16': ['u32', 'i32'], 'u32': ['u64', 'i64'], 'u64': ['f*'],
  'i8': ['i16'], 'i16': ['i32'], 'i32': ['i64'], 'i64': ['f*'],
  'f16': ['f32'], 'bf16': ['f32'], 'f32': ['f64', 'c64'], 'f64': ['c128'],
  'c64': ['c128']
}
graph = nx.from_dict_of_lists(lattice, create_using=nx.DiGraph)
pos = {
  'i*': [-1.25, 0.5], 'f*': [4.5, 0.5], 'c*': [5, 1.5],
  'u8': [0.5, 0], 'u16': [1.5, 0], 'u32': [2.5, 0], 'u64': [3.5, 0],
  'i8': [0, 1], 'i16': [1, 1], 'i32': [2, 1], 'i64': [3, 1],
  'f16': [5.75, 0.8], 'bf16': [5.75, 0.2], 'f32': [7, 0.5], 'f64': [8, 0.5],
  'c64': [7.5, 1.5], 'c128': [8.5, 1.5],
}
fig, ax = plt.subplots(figsize=(10, 4))
ax.set_ylim(-0.5, 2)
nx.draw(graph, with_labels=True, node_size=1500, node_color='lightgray', pos=pos, ax=ax)
# ax.patches[12].set_linestyle((0, (2, 4)))
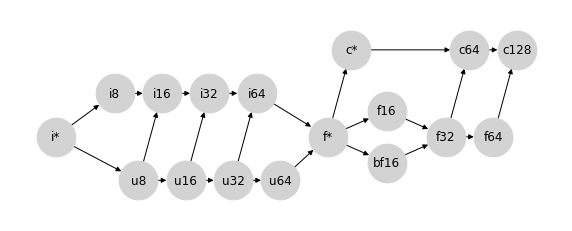
此选择产生的行为在JAX 类型提升语义中进行了总结。值得注意的是,除了包含更大的无符号类型(u16,u32,u64)以及一些关于标量/弱类型(i*,f*,c*)行为的细节之外,这种类型提升方案非常接近 PyTorch 选择的方案。
对于那些感兴趣的人,下面的附录打印了 NumPy、Tensorflow、PyTorch 和 JAX 使用的完整提升表。
附录:类型提升表示例#
以下是一些由各种 Python 数组计算库实现的隐式类型提升表的示例。
NumPy 类型提升#
请注意,NumPy 不包含 bfloat16 dtype,并且下表忽略了依赖于值的效果。
显示代码单元格源
# @title

import numpy as np
import pandas as pd
from IPython import display

np_dtypes = {
  'b': np.bool_,
  'u8': np.uint8, 'u16': np.uint16, 'u32': np.uint32, 'u64': np.uint64,
  'i8': np.int8, 'i16': np.int16, 'i32': np.int32, 'i64': np.int64,
  'bf16': 'invalid', 'f16': np.float16, 'f32': np.float32, 'f64': np.float64,
  'c64': np.complex64, 'c128': np.complex128,
  'i*': int, 'f*': float, 'c*': complex}

np_dtype_to_code = {val: key for key, val in np_dtypes.items()}

def make_np_zero(dtype):
  if dtype in {int, float, complex}:
    return dtype(0)
  else:
    return np.zeros(1, dtype=dtype)

def np_result_code(dtype1, dtype2):
  try:
    out = np.add(make_np_zero(dtype1), make_np_zero(dtype2))
  except TypeError:
    return '-'
  else:
    if type(out) in {int, float, complex}:
      return np_dtype_to_code[type(out)]
    else:
      return np_dtype_to_code[out.dtype.type]


grid = [[np_result_code(dtype1, dtype2)
         for dtype2 in np_dtypes.values()]
        for dtype1 in np_dtypes.values()]
table = pd.DataFrame(grid, index=np_dtypes.keys(), columns=np_dtypes.keys())
display.HTML(table.to_html())
| b | u8 | u16 | u32 | u64 | i8 | i16 | i32 | i64 | bf16 | f16 | f32 | f64 | c64 | c128 | i* | f* | c* | |
|---|---|---|---|---|---|---|---|---|---|---|---|---|---|---|---|---|---|---|
| b | b | u8 | u16 | u32 | u64 | i8 | i16 | i32 | i64 | - | f16 | f32 | f64 | c64 | c128 | i64 | f64 | c128 |
| u8 | u8 | u8 | u16 | u32 | u64 | i16 | i16 | i32 | i64 | - | f16 | f32 | f64 | c64 | c128 | u8 | f64 | c128 |
| u16 | u16 | u16 | u16 | u32 | u64 | i32 | i32 | i32 | i64 | - | f32 | f32 | f64 | c64 | c128 | u16 | f64 | c128 |
| u32 | u32 | u32 | u32 | u32 | u64 | i64 | i64 | i64 | i64 | - | f64 | f64 | f64 | c128 | c128 | u32 | f64 | c128 |
| u64 | u64 | u64 | u64 | u64 | u64 | f64 | f64 | f64 | f64 | - | f64 | f64 | f64 | c128 | c128 | u64 | f64 | c128 |
| i8 | i8 | i16 | i32 | i64 | f64 | i8 | i16 | i32 | i64 | - | f16 | f32 | f64 | c64 | c128 | i8 | f64 | c128 |
| i16 | i16 | i16 | i32 | i64 | f64 | i16 | i16 | i32 | i64 | - | f32 | f32 | f64 | c64 | c128 | i16 | f64 | c128 |
| i32 | i32 | i32 | i32 | i64 | f64 | i32 | i32 | i32 | i64 | - | f64 | f64 | f64 | c128 | c128 | i32 | f64 | c128 |
| i64 | i64 | i64 | i64 | i64 | f64 | i64 | i64 | i64 | i64 | - | f64 | f64 | f64 | c128 | c128 | i64 | f64 | c128 |
| bf16 | - | - | - | - | - | - | - | - | - | - | - | - | - | - | - | - | - | - |
| f16 | f16 | f16 | f32 | f64 | f64 | f16 | f32 | f64 | f64 | - | f16 | f32 | f64 | c64 | c128 | f16 | f16 | c64 |
| f32 | f32 | f32 | f32 | f64 | f64 | f32 | f32 | f64 | f64 | - | f32 | f32 | f64 | c64 | c128 | f32 | f32 | c64 |
| f64 | f64 | f64 | f64 | f64 | f64 | f64 | f64 | f64 | f64 | - | f64 | f64 | f64 | c128 | c128 | f64 | f64 | c128 |
| c64 | c64 | c64 | c64 | c128 | c128 | c64 | c64 | c128 | c128 | - | c64 | c64 | c128 | c64 | c128 | c64 | c64 | c64 |
| c128 | c128 | c128 | c128 | c128 | c128 | c128 | c128 | c128 | c128 | - | c128 | c128 | c128 | c128 | c128 | c128 | c128 | c128 |
| i* | i64 | u8 | u16 | u32 | u64 | i8 | i16 | i32 | i64 | - | f16 | f32 | f64 | c64 | c128 | i64 | f64 | c128 |
| f* | f64 | f64 | f64 | f64 | f64 | f64 | f64 | f64 | f64 | - | f16 | f32 | f64 | c64 | c128 | f64 | f64 | c128 |
| c* | c128 | c128 | c128 | c128 | c128 | c128 | c128 | c128 | c128 | - | c64 | c64 | c128 | c64 | c128 | c128 | c128 | c128 |
Tensorflow 类型提升#
Tensorflow 避免定义隐式类型提升,除非在有限的情况下针对 Python 标量。该表是不对称的,因为在 tf.add(x, y) 中,y 的类型必须可强制转换为 x 的类型。
显示代码单元格源
# @title

import tensorflow as tf
import pandas as pd
from IPython import display

tf_dtypes = {
  'b': tf.bool,
  'u8': tf.uint8, 'u16': tf.uint16, 'u32': tf.uint32, 'u64': tf.uint64,
  'i8': tf.int8, 'i16': tf.int16, 'i32': tf.int32, 'i64': tf.int64,
  'bf16': tf.bfloat16, 'f16': tf.float16, 'f32': tf.float32, 'f64': tf.float64,
  'c64': tf.complex64, 'c128': tf.complex128,
  'i*': int, 'f*': float, 'c*': complex}

tf_dtype_to_code = {val: key for key, val in tf_dtypes.items()}

def make_tf_zero(dtype):
  if dtype in {int, float, complex}:
    return dtype(0)
  else:
    return tf.zeros(1, dtype=dtype)

def result_code(dtype1, dtype2):
  try:
    out = tf.add(make_tf_zero(dtype1), make_tf_zero(dtype2))
  except (TypeError, tf.errors.InvalidArgumentError):
    return '-'
  else:
    if type(out) in {int, float, complex}:
      return tf_dtype_to_code[type(out)]
    else:
      return tf_dtype_to_code[out.dtype]


grid = [[result_code(dtype1, dtype2)
         for dtype2 in tf_dtypes.values()]
        for dtype1 in tf_dtypes.values()]
table = pd.DataFrame(grid, index=tf_dtypes.keys(), columns=tf_dtypes.keys())
display.HTML(table.to_html())
| b | u8 | u16 | u32 | u64 | i8 | i16 | i32 | i64 | bf16 | f16 | f32 | f64 | c64 | c128 | i* | f* | c* | |
|---|---|---|---|---|---|---|---|---|---|---|---|---|---|---|---|---|---|---|
| b | - | - | - | - | - | - | - | - | - | - | - | - | - | - | - | - | - | - |
| u8 | - | u8 | - | - | - | - | - | - | - | - | - | - | - | - | - | u8 | - | - |
| u16 | - | - | u16 | - | - | - | - | - | - | - | - | - | - | - | - | u16 | - | - |
| u32 | - | - | - | u32 | - | - | - | - | - | - | - | - | - | - | - | u32 | - | - |
| u64 | - | - | - | - | u64 | - | - | - | - | - | - | - | - | - | - | u64 | - | - |
| i8 | - | - | - | - | - | i8 | - | - | - | - | - | - | - | - | - | i8 | - | - |
| i16 | - | - | - | - | - | - | i16 | - | - | - | - | - | - | - | - | i16 | - | - |
| i32 | - | - | - | - | - | - | - | i32 | - | - | - | - | - | - | - | i32 | - | - |
| i64 | - | - | - | - | - | - | - | - | i64 | - | - | - | - | - | - | i64 | - | - |
| bf16 | - | - | - | - | - | - | - | - | - | bf16 | - | - | - | - | - | bf16 | bf16 | - |
| f16 | - | - | - | - | - | - | - | - | - | - | f16 | - | - | - | - | f16 | f16 | - |
| f32 | - | - | - | - | - | - | - | - | - | - | - | f32 | - | - | - | f32 | f32 | - |
| f64 | - | - | - | - | - | - | - | - | - | - | - | - | f64 | - | - | f64 | f64 | - |
| c64 | - | - | - | - | - | - | - | - | - | - | - | - | - | c64 | - | c64 | c64 | c64 |
| c128 | - | - | - | - | - | - | - | - | - | - | - | - | - | - | c128 | c128 | c128 | c128 |
| i* | - | - | - | - | - | - | - | i32 | - | - | - | - | - | - | - | i32 | - | - |
| f* | - | - | - | - | - | - | - | - | - | - | - | f32 | - | - | - | f32 | f32 | - |
| c* | - | - | - | - | - | - | - | - | - | - | - | - | - | - | c128 | c128 | c128 | c128 |
PyTorch 类型提升#
请注意,torch 不包含大于 uint8 的无符号整数类型。除此之外,以及一些关于使用标量/弱类型进行提升的细节外,该表与 jax.numpy 使用的表非常接近。
显示代码单元格源
# @title
import torch
import pandas as pd
from IPython import display

torch_dtypes = {
  'b': torch.bool,
  'u8': torch.uint8, 'u16': 'invalid', 'u32': 'invalid', 'u64': 'invalid',
  'i8': torch.int8, 'i16': torch.int16, 'i32': torch.int32, 'i64': torch.int64,
  'bf16': torch.bfloat16, 'f16': torch.float16, 'f32': torch.float32, 'f64': torch.float64,
  'c64': torch.complex64, 'c128': torch.complex128,
  'i*': int, 'f*': float, 'c*': complex}

torch_dtype_to_code = {val: key for key, val in torch_dtypes.items()}

def make_torch_zero(dtype):
  if dtype in {int, float, complex}:
    return dtype(0)
  else:
    return torch.zeros(1, dtype=dtype)

def torch_result_code(dtype1, dtype2):
  try:
    out = torch.add(make_torch_zero(dtype1), make_torch_zero(dtype2))
  except TypeError:
    return '-'
  else:
    if type(out) in {int, float, complex}:
      return torch_dtype_to_code[type(out)]
    else:
      return torch_dtype_to_code[out.dtype]


grid = [[torch_result_code(dtype1, dtype2)
         for dtype2 in torch_dtypes.values()]
        for dtype1 in torch_dtypes.values()]
table = pd.DataFrame(grid, index=torch_dtypes.keys(), columns=torch_dtypes.keys())
display.HTML(table.to_html())
| b | u8 | u16 | u32 | u64 | i8 | i16 | i32 | i64 | bf16 | f16 | f32 | f64 | c64 | c128 | i* | f* | c* | |
|---|---|---|---|---|---|---|---|---|---|---|---|---|---|---|---|---|---|---|
| b | b | u8 | - | - | - | i8 | i16 | i32 | i64 | bf16 | f16 | f32 | f64 | c64 | c128 | i64 | f32 | c64 |
| u8 | u8 | u8 | - | - | - | i16 | i16 | i32 | i64 | bf16 | f16 | f32 | f64 | c64 | c128 | u8 | f32 | c64 |
| u16 | - | - | - | - | - | - | - | - | - | - | - | - | - | - | - | - | - | - |
| u32 | - | - | - | - | - | - | - | - | - | - | - | - | - | - | - | - | - | - |
| u64 | - | - | - | - | - | - | - | - | - | - | - | - | - | - | - | - | - | - |
| i8 | i8 | i16 | - | - | - | i8 | i16 | i32 | i64 | bf16 | f16 | f32 | f64 | c64 | c128 | i8 | f32 | c64 |
| i16 | i16 | i16 | - | - | - | i16 | i16 | i32 | i64 | bf16 | f16 | f32 | f64 | c64 | c128 | i16 | f32 | c64 |
| i32 | i32 | i32 | - | - | - | i32 | i32 | i32 | i64 | bf16 | f16 | f32 | f64 | c64 | c128 | i32 | f32 | c64 |
| i64 | i64 | i64 | - | - | - | i64 | i64 | i64 | i64 | bf16 | f16 | f32 | f64 | c64 | c128 | i64 | f32 | c64 |
| bf16 | bf16 | bf16 | - | - | - | bf16 | bf16 | bf16 | bf16 | bf16 | f32 | f32 | f64 | c64 | c128 | bf16 | bf16 | c64 |
| f16 | f16 | f16 | - | - | - | f16 | f16 | f16 | f16 | f32 | f16 | f32 | f64 | c64 | c128 | f16 | f16 | c64 |
| f32 | f32 | f32 | - | - | - | f32 | f32 | f32 | f32 | f32 | f32 | f32 | f64 | c64 | c128 | f32 | f32 | c64 |
| f64 | f64 | f64 | - | - | - | f64 | f64 | f64 | f64 | f64 | f64 | f64 | f64 | c128 | c128 | f64 | f64 | c128 |
| c64 | c64 | c64 | - | - | - | c64 | c64 | c64 | c64 | c64 | c64 | c64 | c128 | c64 | c128 | c64 | c64 | c64 |
| c128 | c128 | c128 | - | - | - | c128 | c128 | c128 | c128 | c128 | c128 | c128 | c128 | c128 | c128 | c128 | c128 | c128 |
| i* | i64 | u8 | - | - | - | i8 | i16 | i32 | i64 | bf16 | f16 | f32 | f64 | c64 | c128 | i64 | f32 | c64 |
| f* | f32 | f32 | - | - | - | f32 | f32 | f32 | f32 | bf16 | f16 | f32 | f64 | c64 | c128 | f32 | f64 | c64 |
| c* | c64 | c64 | - | - | - | c64 | c64 | c64 | c64 | c64 | c64 | c64 | c128 | c64 | c128 | c64 | c64 | c128 |
JAX 类型提升:jax.numpy#
jax.numpy 遵循 https://jax.ac.cn/en/latest/type_promotion.html 中规定的类型提升规则。这里我们使用 i*、f*、c* 来表示 Python 标量和弱类型数组。
显示代码单元格源
# @title
import jax
import jax.numpy as jnp
import pandas as pd
from IPython import display
jax.config.update('jax_enable_x64', True)

jnp_dtypes = {
  'b': jnp.bool_.dtype,
  'u8': jnp.uint8.dtype, 'u16': jnp.uint16.dtype, 'u32': jnp.uint32.dtype, 'u64': jnp.uint64.dtype,
  'i8': jnp.int8.dtype, 'i16': jnp.int16.dtype, 'i32': jnp.int32.dtype, 'i64': jnp.int64.dtype,
  'bf16': jnp.bfloat16.dtype, 'f16': jnp.float16.dtype, 'f32': jnp.float32.dtype, 'f64': jnp.float64.dtype,
  'c64': jnp.complex64.dtype, 'c128': jnp.complex128.dtype,
  'i*': int, 'f*': float, 'c*': complex}


jnp_dtype_to_code = {val: key for key, val in jnp_dtypes.items()}

def make_jnp_zero(dtype):
  if dtype in {int, float, complex}:
    return dtype(0)
  else:
    return jnp.zeros((), dtype=dtype)

def jnp_result_code(dtype1, dtype2):
  try:
    out = jnp.add(make_jnp_zero(dtype1), make_jnp_zero(dtype2))
  except TypeError:
    return '-'
  else:
    if hasattr(out, 'aval') and out.aval.weak_type:
      return out.dtype.kind + '*'
    elif type(out) in {int, float, complex}:
      return jnp_dtype_to_code[type(out)]
    else:
      return jnp_dtype_to_code[out.dtype]

grid = [[jnp_result_code(dtype1, dtype2)
         for dtype2 in jnp_dtypes.values()]
        for dtype1 in jnp_dtypes.values()]
table = pd.DataFrame(grid, index=jnp_dtypes.keys(), columns=jnp_dtypes.keys())
display.HTML(table.to_html())
| b | u8 | u16 | u32 | u64 | i8 | i16 | i32 | i64 | bf16 | f16 | f32 | f64 | c64 | c128 | i* | f* | c* | |
|---|---|---|---|---|---|---|---|---|---|---|---|---|---|---|---|---|---|---|
| b | b | u8 | u16 | u32 | u64 | i8 | i16 | i32 | i64 | bf16 | f16 | f32 | f64 | c64 | c128 | i* | f* | c* |
| u8 | u8 | u8 | u16 | u32 | u64 | i16 | i16 | i32 | i64 | bf16 | f16 | f32 | f64 | c64 | c128 | u8 | f* | c* |
| u16 | u16 | u16 | u16 | u32 | u64 | i32 | i32 | i32 | i64 | bf16 | f16 | f32 | f64 | c64 | c128 | u16 | f* | c* |
| u32 | u32 | u32 | u32 | u32 | u64 | i64 | i64 | i64 | i64 | bf16 | f16 | f32 | f64 | c64 | c128 | u32 | f* | c* |
| u64 | u64 | u64 | u64 | u64 | u64 | f* | f* | f* | f* | bf16 | f16 | f32 | f64 | c64 | c128 | u64 | f* | c* |
| i8 | i8 | i16 | i32 | i64 | f* | i8 | i16 | i32 | i64 | bf16 | f16 | f32 | f64 | c64 | c128 | i8 | f* | c* |
| i16 | i16 | i16 | i32 | i64 | f* | i16 | i16 | i32 | i64 | bf16 | f16 | f32 | f64 | c64 | c128 | i16 | f* | c* |
| i32 | i32 | i32 | i32 | i64 | f* | i32 | i32 | i32 | i64 | bf16 | f16 | f32 | f64 | c64 | c128 | i32 | f* | c* |
| i64 | i64 | i64 | i64 | i64 | f* | i64 | i64 | i64 | i64 | bf16 | f16 | f32 | f64 | c64 | c128 | i64 | f* | c* |
| bf16 | bf16 | bf16 | bf16 | bf16 | bf16 | bf16 | bf16 | bf16 | bf16 | bf16 | f32 | f32 | f64 | c64 | c128 | bf16 | bf16 | c64 |
| f16 | f16 | f16 | f16 | f16 | f16 | f16 | f16 | f16 | f16 | f32 | f16 | f32 | f64 | c64 | c128 | f16 | f16 | c64 |
| f32 | f32 | f32 | f32 | f32 | f32 | f32 | f32 | f32 | f32 | f32 | f32 | f32 | f64 | c64 | c128 | f32 | f32 | c64 |
| f64 | f64 | f64 | f64 | f64 | f64 | f64 | f64 | f64 | f64 | f64 | f64 | f64 | f64 | c128 | c128 | f64 | f64 | c128 |
| c64 | c64 | c64 | c64 | c64 | c64 | c64 | c64 | c64 | c64 | c64 | c64 | c64 | c128 | c64 | c128 | c64 | c64 | c64 |
| c128 | c128 | c128 | c128 | c128 | c128 | c128 | c128 | c128 | c128 | c128 | c128 | c128 | c128 | c128 | c128 | c128 | c128 | c128 |
| i* | i* | u8 | u16 | u32 | u64 | i8 | i16 | i32 | i64 | bf16 | f16 | f32 | f64 | c64 | c128 | i* | f* | c* |
| f* | f* | f* | f* | f* | f* | f* | f* | f* | f* | bf16 | f16 | f32 | f64 | c64 | c128 | f* | f* | c* |
| c* | c* | c* | c* | c* | c* | c* | c* | c* | c* | c64 | c64 | c64 | c128 | c64 | c128 | c* | c* | c* |
JAX 类型提升:jax.lax#
jax.lax 是更底层的,并且不执行任何隐式提升。这里我们使用 i*、f*、c* 来表示 Python 标量和弱类型数组。
显示代码单元格源
# @title
import jax
import jax.numpy as jnp
import pandas as pd
from IPython import display
jax.config.update('jax_enable_x64', True)

jnp_dtypes = {
  'b': jnp.bool_.dtype,
  'u8': jnp.uint8.dtype, 'u16': jnp.uint16.dtype, 'u32': jnp.uint32.dtype, 'u64': jnp.uint64.dtype,
  'i8': jnp.int8.dtype, 'i16': jnp.int16.dtype, 'i32': jnp.int32.dtype, 'i64': jnp.int64.dtype,
  'bf16': jnp.bfloat16.dtype, 'f16': jnp.float16.dtype, 'f32': jnp.float32.dtype, 'f64': jnp.float64.dtype,
  'c64': jnp.complex64.dtype, 'c128': jnp.complex128.dtype,
  'i*': int, 'f*': float, 'c*': complex}


jnp_dtype_to_code = {val: key for key, val in jnp_dtypes.items()}

def make_jnp_zero(dtype):
  if dtype in {int, float, complex}:
    return dtype(0)
  else:
    return jnp.zeros((), dtype=dtype)

def jnp_result_code(dtype1, dtype2):
  try:
    out = jax.lax.add(make_jnp_zero(dtype1), make_jnp_zero(dtype2))
  except TypeError:
    return '-'
  else:
    if hasattr(out, 'aval') and out.aval.weak_type:
      return out.dtype.kind + '*'
    elif type(out) in {int, float, complex}:
      return jnp_dtype_to_code[type(out)]
    else:
      return jnp_dtype_to_code[out.dtype]

grid = [[jnp_result_code(dtype1, dtype2)
         for dtype2 in jnp_dtypes.values()]
        for dtype1 in jnp_dtypes.values()]
table = pd.DataFrame(grid, index=jnp_dtypes.keys(), columns=jnp_dtypes.keys())
display.HTML(table.to_html())
| b | u8 | u16 | u32 | u64 | i8 | i16 | i32 | i64 | bf16 | f16 | f32 | f64 | c64 | c128 | i* | f* | c* | |
|---|---|---|---|---|---|---|---|---|---|---|---|---|---|---|---|---|---|---|
| b | - | - | - | - | - | - | - | - | - | - | - | - | - | - | - | - | - | - |
| u8 | - | u8 | - | - | - | - | - | - | - | - | - | - | - | - | - | - | - | - |
| u16 | - | - | u16 | - | - | - | - | - | - | - | - | - | - | - | - | - | - | - |
| u32 | - | - | - | u32 | - | - | - | - | - | - | - | - | - | - | - | - | - | - |
| u64 | - | - | - | - | u64 | - | - | - | - | - | - | - | - | - | - | - | - | - |
| i8 | - | - | - | - | - | i8 | - | - | - | - | - | - | - | - | - | - | - | - |
| i16 | - | - | - | - | - | - | i16 | - | - | - | - | - | - | - | - | - | - | - |
| i32 | - | - | - | - | - | - | - | i32 | - | - | - | - | - | - | - | - | - | - |
| i64 | - | - | - | - | - | - | - | - | i64 | - | - | - | - | - | - | i64 | - | - |
| bf16 | - | - | - | - | - | - | - | - | - | bf16 | - | - | - | - | - | - | - | - |
| f16 | - | - | - | - | - | - | - | - | - | - | f16 | - | - | - | - | - | - | - |
| f32 | - | - | - | - | - | - | - | - | - | - | - | f32 | - | - | - | - | - | - |
| f64 | - | - | - | - | - | - | - | - | - | - | - | - | f64 | - | - | - | f64 | - |
| c64 | - | - | - | - | - | - | - | - | - | - | - | - | - | c64 | - | - | - | - |
| c128 | - | - | - | - | - | - | - | - | - | - | - | - | - | - | c128 | - | - | c128 |
| i* | - | - | - | - | - | - | - | - | i64 | - | - | - | - | - | - | i* | - | - |
| f* | - | - | - | - | - | - | - | - | - | - | - | - | f64 | - | - | - | f* | - |
| c* | - | - | - | - | - | - | - | - | - | - | - | - | - | - | c128 | - | - | c* |

